
カレンダー作成でのエクセルVBAの設定
和暦西暦変換に関してのVBAは、すでに記載済みなのでここでは重複するので省略します。

エクセルVBAの設定が必要なコマンドボタンは、以下の通りです。
- 【日付】ボタン(CommandButton1~37)
- 【表示】ボタン(CommandButton38)
- 【前月】ボタン(CommandButton41)
- 【翌月】ボタン(CommandButton42)
では、順に各コマンドボタンにVBAコードを記載していきましょう。
【日付】ボタン
1~37まである【日付】ボタン。
押されたら、セルJ2に表示されている数字が転記されるように設定します。
全て同じVBAコードを書きます。(但し、コマンドボタンの番号が違うだけです)
Range(“J2”).Value = CommandButton1.Caption
End Sub
- コマンドボタン1が押されたら
- セルJ2の値はコマンドボタン1のキャプション(表示文字)を転記する
- マクロ終了
これだけで、あとはコマンドボタン37まで繰り返すだけですが、赤色アンダーラインの数字だけを書くコマンドボタンの番号にするだけです。
これで、1~37のどのコマンドボタンを押しても表示されている数字がセルJ2に必ず転記されます。
次が一番大事な【表示】ボタンにVBAコードを書きましょう
【表示】ボタン
「年」「月」を各テキストボックスに入力して、【表示】ボタンを押すと「日」を表す先ほど設定した1~37の各コマンドボタンにカレンダーの日付を表示させる為の【表示】ボタンです。
ここで使用するVBAコードは下記の通りです。
- もし~だったらのIfステートメント
- テキストボックスが空欄の時を示す「””」
- メッセージを表示する
- テキストボックスの値をセルに転記する
- 繰り返し処理のFor~Next
- 色指定するForeColor
- コマンドボタンの文字をセルの値にする
【表示】ボタンにはこのようなVBAコードを書いてあります。
If TextBox1.Value = “” Or TextBox2.Value = “” Then
MsgBox “年・月を入力してください”
Else
Range(“A2”).Value = TextBox1.Text
Range(“B2”).Value = TextBox2.Text
End If
For i = 1 To 37
With UserForm1.Controls(“CommandButton” & i)
.ForeColor = RGB(255, 0, 0)
End With
Next i
If Range(“D6”).Value = 0 Then
CommandButton2.ForeColor = RGB(0, 0, 0)
End If
If Range(“D7”).Value = 0 Then
CommandButton3.ForeColor = RGB(0, 0, 0)
End If
If Range(“D8”).Value = 0 Then
CommandButton4.ForeColor = RGB(0, 0, 0)
End If
If Range(“D9”).Value = 0 Then
CommandButton5.ForeColor = RGB(0, 0, 0)
End If
If Range(“D10”).Value = 0 Then
CommandButton6.ForeColor = RGB(0, 0, 0)
End If
If Range(“D11”).Value = 0 Then
CommandButton7.ForeColor = RGB(0, 0, 256)
End If
If Range(“D13”).Value = 0 Then
CommandButton9.ForeColor = RGB(0, 0, 0)
End If
If Range(“D14”).Value = 0 Then
CommandButton10.ForeColor = RGB(0, 0, 0)
End If
If Range(“D15”).Value = 0 Then
CommandButton11.ForeColor = RGB(0, 0, 0)
End If
If Range(“D16”).Value = 0 Then
CommandButton12.ForeColor = RGB(0, 0, 0)
End If
If Range(“D17”).Value = 0 Then
CommandButton13.ForeColor = RGB(0, 0, 0)
End If
If Range(“D18”).Value = 0 Then
CommandButton14.ForeColor = RGB(0, 0, 256)
End If
If Range(“D20”).Value = 0 Then
CommandButton16.ForeColor = RGB(0, 0, 0)
End If
If Range(“D21”).Value = 0 Then
CommandButton17.ForeColor = RGB(0, 0, 0)
End If
If Range(“D22”).Value = 0 Then
CommandButton18.ForeColor = RGB(0, 0, 0)
End If
If Range(“D23”).Value = 0 Then
CommandButton19.ForeColor = RGB(0, 0, 0)
End If
If Range(“D24”).Value = 0 Then
CommandButton20.ForeColor = RGB(0, 0, 0)
End If
If Range(“D25”).Value = 0 Then
CommandButton21.ForeColor = RGB(0, 0, 256)
End If
If Range(“D27”).Value = 0 Then
CommandButton23.ForeColor = RGB(0, 0, 0)
End If
If Range(“D28”).Value = 0 Then
CommandButton24.ForeColor = RGB(0, 0, 0)
End If
If Range(“D29”).Value = 0 Then
CommandButton25.ForeColor = RGB(0, 0, 0)
End If
If Range(“D30”).Value = 0 Then
CommandButton26.ForeColor = RGB(0, 0, 0)
End If
If Range(“D31”).Value = 0 Then
CommandButton27.ForeColor = RGB(0, 0, 0)
End If
If Range(“D32”).Value = 0 Then
CommandButton28.ForeColor = RGB(0, 0, 256)
End If
If Range(“D34”).Value = 0 Then
CommandButton30.ForeColor = RGB(0, 0, 0)
End If
If Range(“D35”).Value = 0 Then
CommandButton31.ForeColor = RGB(0, 0, 0)
End If
If Range(“D36”).Value = 0 Then
CommandButton32.ForeColor = RGB(0, 0, 0)
End If
If Range(“D37”).Value = 0 Then
CommandButton33.ForeColor = RGB(0, 0, 0)
End If
If Range(“D38”).Value = 0 Then
CommandButton34.ForeColor = RGB(0, 0, 0)
End If
If Range(“D39”).Value = 0 Then
CommandButton35.ForeColor = RGB(0, 0, 256)
End If
If Range(“D41”).Value = 0 Then
CommandButton37.ForeColor = RGB(0, 0, 0)
End If
For i = 1 To 37
With UserForm1.Controls(“CommandButton” & i)
.Caption = Cells(i + 4, 2)
End With
Next i
End Sub
長すぎですよね。111行ありますので、色分けしてブロックごとに説明します。
黄色マーカー部分は、「年」「月」が空欄の時にメッセージを出して、入力済みの場合のみセルA2に年を、セルB2に月を転記します。
黄色マーカー部分を抜き出すと見やすいので・・・
If TextBox1.Value = “” Or TextBox2.Value = “” Then
MsgBox “年・月を入力してください”
Else
Range(“A2”).Value = TextBox1.Text
Range(“B2”).Value = TextBox2.Text
End If
- もしテキストボックス1が空欄またはテキストボックス2が空欄だったら
- 「年・月を入力してください」というメッセージを表示する
- そうではなく(入力されていたら)
- セルA2の値はテキストボックス1に入力された値(年)を転記する
- セルB2の値はテキストボックス2に入力された値(月)を転記する
- IFステートメント終了
さほど難しくはありませんね。
次に青色マーカー部分ですが、祝日設定をする為に書いているVBAコードなので、祝日設定しない場合は不要です。
ここの部分では、コマンドボタンの文字色は初期設定では黒色なので、日を表す1~37のコマンドボタンの文字色を赤色にします。
青色マーカー部分を抜き出すと見やすいので・・・
For i = 1 To 37
With UserForm1.Controls(“CommandButton” & i)
.ForeColor = RGB(255, 0, 0)
End With
Next i
- 繰り返し処理をする変数「i」を宣言し、変数「i」は1~37
- ユーザーフォーム1に配置したコマンドボタン番号は変数「i」
- 文字色は赤色
- Withステートメント終了
- 1~37まで繰り返す
そして、マーカーなしの部分ですが、同じく祝日設定しない場合は不要です。
この部分では、セルD5~D41が平日ならば「0」なので、平日の時は文字色を黒色にして、土曜日は青色にしています。
要するに「0」でないと、色の変更をしない(赤色のまま)っていう設定です。
この部分が長すぎるので、平日の設定と土曜日の設定を抜き取りました。
CommandButton6.ForeColor = RGB(0, 0, 0)
End If
If Range(“D11”).Value = 0 Then
CommandButton7.ForeColor = RGB(0, 0, 256)
End If
- もしセルD10の値が「0」だったら
- コマンドボタン6の文字色は黒色
- IFステートメント終了
- もしセルD11の値が「0」だったら
- コマンドボタン7の文字色は青色
- IFステートメント終了
そして最後に赤色マーカーの部分です。
ここでは、日を表示するコマンドボタン1~37にセルB5~B41に表示された値を転記させるVBAコードです。
For i = 1 To 37
With UserForm1.Controls(“CommandButton” & i)
.Caption = Cells(i + 4, 2)
End With
Next i
- 繰り返し処理をする変数「i」を宣言し、変数「i」は1~37
- ユーザーフォーム1に配置したコマンドボタン番号は変数「i」
- 表示文字はセルi行目+4(最初は1+4なので5行目)の2列目(B列)
- Withステートメント終了
- 1~37まで繰り返す
これで、【表示】ボタンを押せば指定した年月のカレンダーが表示されます。
【前月】ボタン
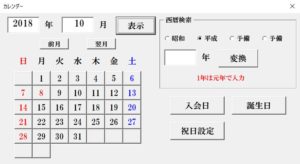
その名の通り、表示している月(画像上2018年10月)の前月(9月)のカレンダーを表示させるためのボタンです。
【前月】ボタンを押すたびに表示された月の前月を表示できるようになっていて、下記のようなVBAコードを書いています。
Range(“B2”).Value = Range(“D2”).Value
TextBox2.Text = Range(“B2”).Value
For i = 1 To 37
With UserForm1.Controls(“CommandButton” & i)
.ForeColor = RGB(255, 0, 0)
End With
Next i
If Range(“D6”).Value = 0 Then
CommandButton2.ForeColor = RGB(0, 0, 0)
End If
If Range(“D7”).Value = 0 Then
CommandButton3.ForeColor = RGB(0, 0, 0)
End If
If Range(“D8”).Value = 0 Then
CommandButton4.ForeColor = RGB(0, 0, 0)
End If
If Range(“D9”).Value = 0 Then
CommandButton5.ForeColor = RGB(0, 0, 0)
End If
If Range(“D10”).Value = 0 Then
CommandButton6.ForeColor = RGB(0, 0, 0)
End If
If Range(“D11”).Value = 0 Then
CommandButton7.ForeColor = RGB(0, 0, 256)
End If
If Range(“D13”).Value = 0 Then
CommandButton9.ForeColor = RGB(0, 0, 0)
End If
If Range(“D14”).Value = 0 Then
CommandButton10.ForeColor = RGB(0, 0, 0)
End If
If Range(“D15”).Value = 0 Then
CommandButton11.ForeColor = RGB(0, 0, 0)
End If
If Range(“D16”).Value = 0 Then
CommandButton12.ForeColor = RGB(0, 0, 0)
End If
If Range(“D17”).Value = 0 Then
CommandButton13.ForeColor = RGB(0, 0, 0)
End If
If Range(“D18”).Value = 0 Then
CommandButton14.ForeColor = RGB(0, 0, 256)
End If
If Range(“D20”).Value = 0 Then
CommandButton16.ForeColor = RGB(0, 0, 0)
End If
If Range(“D21”).Value = 0 Then
CommandButton17.ForeColor = RGB(0, 0, 0)
End If
If Range(“D22”).Value = 0 Then
CommandButton18.ForeColor = RGB(0, 0, 0)
End If
If Range(“D23”).Value = 0 Then
CommandButton19.ForeColor = RGB(0, 0, 0)
End If
If Range(“D24”).Value = 0 Then
CommandButton20.ForeColor = RGB(0, 0, 0)
End If
If Range(“D25”).Value = 0 Then
CommandButton21.ForeColor = RGB(0, 0, 256)
End If
If Range(“D27”).Value = 0 Then
CommandButton23.ForeColor = RGB(0, 0, 0)
End If
If Range(“D28”).Value = 0 Then
CommandButton24.ForeColor = RGB(0, 0, 0)
End If
If Range(“D29”).Value = 0 Then
CommandButton25.ForeColor = RGB(0, 0, 0)
End If
If Range(“D30”).Value = 0 Then
CommandButton26.ForeColor = RGB(0, 0, 0)
End If
If Range(“D31”).Value = 0 Then
CommandButton27.ForeColor = RGB(0, 0, 0)
End If
If Range(“D32”).Value = 0 Then
CommandButton28.ForeColor = RGB(0, 0, 256)
End If
If Range(“D34”).Value = 0 Then
CommandButton30.ForeColor = RGB(0, 0, 0)
End If
If Range(“D35”).Value = 0 Then
CommandButton31.ForeColor = RGB(0, 0, 0)
End If
If Range(“D36”).Value = 0 Then
CommandButton32.ForeColor = RGB(0, 0, 0)
End If
If Range(“D37”).Value = 0 Then
CommandButton33.ForeColor = RGB(0, 0, 0)
End If
If Range(“D38”).Value = 0 Then
CommandButton34.ForeColor = RGB(0, 0, 0)
End If
If Range(“D39”).Value = 0 Then
CommandButton35.ForeColor = RGB(0, 0, 256)
End If
If Range(“D41”).Value = 0 Then
CommandButton37.ForeColor = RGB(0, 0, 0)
End If
For i = 1 To 37
With UserForm1.Controls(“CommandButton” & i)
.Caption = Cells(i + 4, 2)
End With
Next i
End Sub
【表示】ボタンと同じようなVBAコードの為に長いですよね。
違いは、黄色マーカー部分だけでなので、その他の説明は【表示】ボタンと一緒なので省略します。
抜き出したVBAコードがこの部分です。
Range(“B2”).Value = Range(“D2”).Value
TextBox2.Text = Range(“B2”).Value
- セルB2の値をセルD2の値にする
- テキストボックス2の値はセルB2の値にする
「カレンダー作成でのエクセル関数の設定」で説明させていただきましたが、前月はセルD2に記載していますので、【前月】ボタンを押したら、セルB2の値をセルD2に転記(置換)します。
そして、カレンダーフォーム上に前月を表示させる作業をしています。
それ以下のVBAコードで、一旦カレンダーの日の文字色を全て赤色にして祝日を再度読み取ってから日付を再度表示するようにVBAコードが書いてあります。
祝日設定が必要ない場合はこの部分は不要になりますね。
【翌月】ボタン
その名の通り、表示している月(画像上2018年10月)の翌月(11月)のカレンダーを表示させるためのボタンです。
【翌月】ボタンを押すたびに表示された月の翌月を表示できるようになっていて、下記のようなVBAコードを書いています。
Range(“B2”).Value = Range(“D3”).Value
TextBox2.Text = Range(“B2”).Value
For i = 1 To 37
With UserForm1.Controls(“CommandButton” & i)
.ForeColor = RGB(255, 0, 0)
End With
Next i
If Range(“D6”).Value = 0 Then
CommandButton2.ForeColor = RGB(0, 0, 0)
End If
If Range(“D7”).Value = 0 Then
CommandButton3.ForeColor = RGB(0, 0, 0)
End If
If Range(“D8”).Value = 0 Then
CommandButton4.ForeColor = RGB(0, 0, 0)
End If
If Range(“D9”).Value = 0 Then
CommandButton5.ForeColor = RGB(0, 0, 0)
End If
If Range(“D10”).Value = 0 Then
CommandButton6.ForeColor = RGB(0, 0, 0)
End If
If Range(“D11”).Value = 0 Then
CommandButton7.ForeColor = RGB(0, 0, 256)
End If
If Range(“D13”).Value = 0 Then
CommandButton9.ForeColor = RGB(0, 0, 0)
End If
If Range(“D14”).Value = 0 Then
CommandButton10.ForeColor = RGB(0, 0, 0)
End If
If Range(“D15”).Value = 0 Then
CommandButton11.ForeColor = RGB(0, 0, 0)
End If
If Range(“D16”).Value = 0 Then
CommandButton12.ForeColor = RGB(0, 0, 0)
End If
If Range(“D17”).Value = 0 Then
CommandButton13.ForeColor = RGB(0, 0, 0)
End If
If Range(“D18”).Value = 0 Then
CommandButton14.ForeColor = RGB(0, 0, 256)
End If
If Range(“D20”).Value = 0 Then
CommandButton16.ForeColor = RGB(0, 0, 0)
End If
If Range(“D21”).Value = 0 Then
CommandButton17.ForeColor = RGB(0, 0, 0)
End If
If Range(“D22”).Value = 0 Then
CommandButton18.ForeColor = RGB(0, 0, 0)
End If
If Range(“D23”).Value = 0 Then
CommandButton19.ForeColor = RGB(0, 0, 0)
End If
If Range(“D24”).Value = 0 Then
CommandButton20.ForeColor = RGB(0, 0, 0)
End If
If Range(“D25”).Value = 0 Then
CommandButton21.ForeColor = RGB(0, 0, 256)
End If
If Range(“D27”).Value = 0 Then
CommandButton23.ForeColor = RGB(0, 0, 0)
End If
If Range(“D28”).Value = 0 Then
CommandButton24.ForeColor = RGB(0, 0, 0)
End If
If Range(“D29”).Value = 0 Then
CommandButton25.ForeColor = RGB(0, 0, 0)
End If
If Range(“D30”).Value = 0 Then
CommandButton26.ForeColor = RGB(0, 0, 0)
End If
If Range(“D31”).Value = 0 Then
CommandButton27.ForeColor = RGB(0, 0, 0)
End If
If Range(“D32”).Value = 0 Then
CommandButton28.ForeColor = RGB(0, 0, 256)
End If
If Range(“D34”).Value = 0 Then
CommandButton30.ForeColor = RGB(0, 0, 0)
End If
If Range(“D35”).Value = 0 Then
CommandButton31.ForeColor = RGB(0, 0, 0)
End If
If Range(“D36”).Value = 0 Then
CommandButton32.ForeColor = RGB(0, 0, 0)
End If
If Range(“D37”).Value = 0 Then
CommandButton33.ForeColor = RGB(0, 0, 0)
End If
If Range(“D38”).Value = 0 Then
CommandButton34.ForeColor = RGB(0, 0, 0)
End If
If Range(“D39”).Value = 0 Then
CommandButton35.ForeColor = RGB(0, 0, 256)
End If
If Range(“D41”).Value = 0 Then
CommandButton37.ForeColor = RGB(0, 0, 0)
End If
For i = 1 To 37
With UserForm1.Controls(“CommandButton” & i)
.Caption = Cells(i + 4, 2)
End With
Next i
End Sub
【前月】ボタンと同じようなVBAコードの為に長いですよね。
違いは、黄色マーカー部分だけでなので、その他の説明は【前月】ボタンと一緒なので省略します。
抜き出したVBAコードがこの部分です。
Range(“B2”).Value = Range(“D3”).Value
TextBox2.Text = Range(“B2”).Value
- セルB2の値をセルD3の値にする
- テキストボックス2の値はセルB2の値にする
前月ではセルD2に記載していましたが、翌月はセルD3に記載してありますVBAコードは黄色マーカー部分以外一緒でなので省略します。
これで、専門的なエクセルVBAの知識が無くてもエクセル関数との組み合わせで、和暦西暦対応のオリジナルカレンダーを作ることができました。
この方法ならば、選んだ日付の転記先を変えることも簡単ですし、さまざまなエクセルに追加で組み込むことも比較的簡単にカスタマイズしやすいですよね。
ちなみにここで説明に使わせて頂いたのは、会員登録住所録に追加で組み込んだカレンダーです。
その為に、【入会日】【誕生日】ボタンを付け加えてそれぞれ転記したい場所へカレンダーで選択された日付を飛ばしています。